December 21, 2015

Free Holiday Gift Tags

Wishing you and your family a very Merry Christmas. 

I was inspired to pull out my watercolors last night and make a new series of gift tags to share with everyone.

As you can imagine, my tree is filled with lots of special little boxes waiting for my nieces, sisters and daughters. We love wrapping gifts almost as much as we love making them. 


Download the gift tags here


December 18, 2015

Woodland Winter Ornaments

Hello friends - it's a quiet Friday night at my house. We have been working our tails off this week getting all your orders out. Just a few left to send out tomorrow and then the rush is done. It's time to relax, to make gifts, to finish decorating, to enjoy a few treats and most importantly to spend time together.

I always feel like my Christmas celebration starts Christmas Eve and goes through the week after Christmas. That's when life slows down enough for me to catch my breath. When I let wonder wash over my weary soul. It's the time when I stop and listen instead of rushing. It's my time to reflect and dream of the year ahead. I let the weight of winter settle in and enjoy the call of ancient times that the winter solstice brings.

The busy, crazy days before Christmas fly by in a buzz and I enjoy the anticipation but the stress of preparing can be draining. So I eagerly look forward to the quiet and rest after the celebration is over.

But for now, I'm a whiz of an elf. Making things from morning until night with lots of fun side projects sneaking into my daily to-do list. One such project were these fun ornaments that I created for our tree.

The painted wooden pendants are from Summer Wind Arts, a little gift to myself last month. I paired them up with my tiny snowflake beads, which have been a favorite of mine this season. 

I brought in a little more color with waxed linen in green, English cut glass and brass electroplated hematite. They remind me of cozy, knitted sweaters for some reason. 

This little guy, in an action shot.

My beloved snowflake beads.

Being a Michigan girl, I've always loved snow and snowflake patterns. This year we are enjoying a green Christmas. After two very rough winters, I'm cool with this. I'm sure it will snow soon enough. A white Christmas does holds it's own kind of magic, but a late snow in the season is just as beautiful and inspiring. 

I'm off to create for the rest of the night, I have some special gifts to make for the girls on my list. How are your gift-making adventures going? Are you done yet? 

Have a great weekend!  

December 12, 2015

Accidentally on Trend

 
A week or so ago I spotted the Pantone Color of the Year for 2016. My first reaction to the baby blue and pink, uh - no thank you. And then I saw the spring color palette. Not for me.

But then, as I started seeing the colors everywhere, I couldn't help but notice how trendy and fresh the colors were feeling and that I hadn't really given then much of a chance. I remember feeling the same about Marsala last year. 

But then it hit me as I was looking at some of the entries for the Art Bead Scene's monthly challenge. Our inspiration painting this month was totally on trend in the color palette and color of the year for 2016. Kinda shocking considering the painting was created in 1951 by French artist Maria Helena Vieira de Silva. 


And later that same week I created these winter inspired wobbles and blam, totally the colors of our challenge and hey - is that Serenity Blue and Rose Quartz subconsciously stuck in there. Why yes, I think it is. And then I really started to look into the Color of the Year and spring palette with a new perspective and found a wealth of inspiration.

Here are two more color palettes I pulled from the inspiration painting. I went for a mix of grey and muted colors to balance out blue and pink.

For this palette I would focus more on blue/yellow combo with the pink and rust as small accent.

The HOLY GRAIL Pinterest Board 
for the Pantone Spring Colors for Jewelry Designers

100 pins of color combinations, patterns, art, fashion, jewelry and beads


I know it's not even really winter yet and I'm already jumping ahead to spring. But in a few weeks everything is going to be new year, new goals, new designs and you'll be so happy to have some spring colors to play to use in your jewelry.

So for this weekend only I'm having a flash sale on my website.

Use code COLORFLASH for 30% off your order. Sale ends Monday.
But check out the Pinterest board first for your inspirations!


So what do you think of Pantone's Colors of the Year? 
Did you take a look at my Pinterest board and have any different reactions? 

December 11, 2015

Jewelry Inventory

Some times I need a quick and easy way to share something online and today this blog is the best choice. So you get a big dose of eye candy and the shop owner that needs to see what I have in stock has an easy way to scroll through everything quickly. 

 Butterfly Wings: Teal, Blue and Pink

Dark Forest Pendant, Winter Owl Pendant, Dogwood Pendant

Acorn Pendants, Blue and Yellow.

Owl Charm Pendants

 Blue Bird Pendant, Cardinal Pendant

Nesting Pendant, Brown. Peace Pendant. Nesting Pendant, Olive Green.

Oak Leaf Pendant

Maple Seed Pendant

Snowy Mountain Pendant

Holly Pendant, small and large.

Fairy Garden Pendants.

Tiger Lily Pendant. Feather Pendant. Meadowlark Pendant. Blue Flower Pendant.  

Butterfly Wrap Around Bracelets, Purple/copper (4), Earthtone (2), Olive & Pink (2)

Butterfly Wrap Around Bracelets, Left: Purple (top) or Berry. Right: Bronze (top) Copper (2)

 Evergreen Cuff Bracelet

 Birch Bark Cuff Bracelet (large)

 Oak Leaf Cuff Bracelet

Birch Bark Cuff Bracelet

Oak Leaf Earrings: Purple, Dark Teal, Jade.

 Butterfly Charms: Purple, Teal.

Butterfly Earrings: Purple, Cream, Light Orange, Dark Orange.

Festive Earrings: Silver (3), Bronze (3). Nest Earrings (3)

 Ceramic Charm Earrings: Bird, Dragonfly, Leaf.


Birch Bark Earrings, various accent colors (5)

Maple Seed Earrings (3)

December 9, 2015

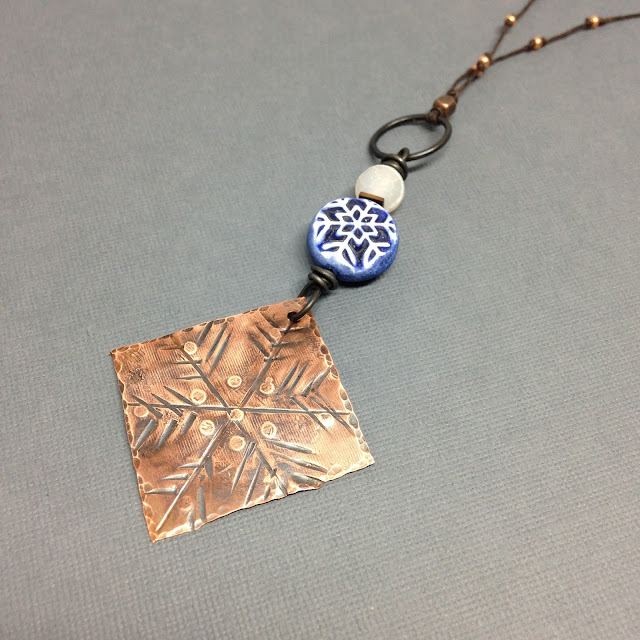
Ornament Blog Hop: Metal Sketch Snowflakes

I love making handmade ornaments. In fact, I have a tiny tree in my house filled with ones I've made over the years with special art beads. I also have handmade ornaments filling my tree and love giving them as gifts too. Art beads create instant heirloom status for a handcrafted ornament!


This year I made ornaments to celebrate the release of my new book, Beautiful Elements. The book features many projects using metal, hammers, tools and wire to create images or metal sketches as I've coined them in the book.

I added one of my snowflake coin beads to each ornament along with an icy looking stone. The hangers are waxed linen with copper seed beads. 

The evergreen one is featured on the Art Bead Scene. You can also enter to win a set of my snowflake coins over on there too!

Another ornament that has been getting created quite a bit in the studio is this snowy owl. Taken from a drawing in my sketchbook. I made one for my tree and have been sending them out to their new homes too!

Thanks for stopping by for a visit!

Head on over the Art Bead Scene to see everyone's creations and enter to win those snowflake beads.

November 8, 2015

Leather Bracelet with Micro Screws & Nuts Tutorial

Isn't it great to find a project that takes minutes to make but creates a big visual punch? Pair up my bracelet cuff with leather straps for a super simple project that is fun to wear and stack with other bracelet designs. Micro screws and nuts make this a no-fail project with very minimal tools and no riveting experience needed!
Supplies
Bracelet cuff
8” 19 gauge steel wire
2 15mm brass jump rings
10” leather strap ½” wide
18mm x 20mm copper E hook clasp
4 micro 1” screw and nut sets


Metal punch
Wire cutters
Scissors
Bench block
Ball peen hammer
Find leather, E hook clasp, jump rings, micro screw and nuts at Lima Beads
Bracelet cuffs from Humblebeads.etsy.com
Use 4" of steel wire to create a wrapped bail on the bracelet cuff. Repeat on the other side. 

1. Attach the 15mm jump ring to each end of the bracelet cuff.  Cut the leather strap in half. String one leather strap through the 15mm jump ring and fold the end of the leather strap over at 1/2” from the end. Punch a hole through the overlapped leather pieces ¼” from the jump ring. Make sure the punch goes through both pieces of leather. 

Tip: Always punch the hole from the top of the leather strap.

2. Thread the bolt through the leather straps with the finished end facing up on top of the leather straps.

3. Thread on the nut on the bolt on the back of the leather.

4. Use chain nose pliers to tighten the nut securely.

5. Trim off the end of the bolt wire cutters flush to the nut.  

6. Place the bracelet with the nut side up on top of the bench block, lightly tap the cut off end of the bolt with the ball peen hammer to flatten the end slightly.  

7. Measure the straps to fit your wrist with 1/2” extra leather on each side, trim leather to shorten if needed. Thread the closed end of the  E hook clasp through the end of one of the straps, fold the strap over and punch a hole a 1/4” from the clasp. Repeat step 4. & 5. to secure the leather loop.

8. Repeat step 7 on the other side of the leather strap, making a loop with the 1/2” of leather without inserting the clasp.


Order more leather, screws and clasps than you think you'll need because these bracelets are addictive and you'll want to whip up a pile of them!!!!