December 21, 2017

Tacky Holiday Earring Blog Hop

My friend Diana put out a challenge on Facebook a few weeks ago to create a tacky pair of earrings to sport with those lovely ugly Christmas sweaters. I thought it sounded like fun and jumped on board. 


Unfortunately I can't wear earrings, but that doesn't stop me from making them! I wanted to create earrings that I could gift to my 20-something daughter and niece, who are always up for fun. 

I'm not sure if these are exactly tacky, but they are bit more wild than things I'd normally create. So grade me on my Humblebeads scale, these are pretty out there for me! 

My first pair I used my folk earring charms that were inspired by the patterns of knitted socks. I used large wood beads with Czech glass and tied tinsel-ish ribbon between the beads. I could so see my daughter wearing these with a cute pink sweater, rocking around the Christmas tree. 

I spotted these triangle frames at the craft store and immediately thought they'd make a good Christmas tree. I knotted them with Czech glass beads in between and added a bit of sparkle for the star. These are some seriously long earrings, the tiny bits of waxed linen at the bottom touch the shoulders! These will go to my niece who wears super huge earrings all the time. 


I recommend listening to Hipster Holiday on Pandora, grab a candy cane and enjoy the zany creations by my fellow bloggers:

Diana Ptaszynksi - Our host! 

Michelle Ann McCarthy
Heather Powers - You are here!
Loralee Kolton
Sue Kennedy
Melissa Trudinger
Kari Asbury
Sandi Volpe
Lindsay Starr
Laney Mead

Heather Boardman 

May 6, 2017

Woodland Flora Pendant - Free Project

Whip up a woodland inspired pendant in just a few minutes for some instant nature charm! My new Renaissance Faux Copper Leaf Pendant is combined with a colorful collection of Czech glass. The beads swing from a branch toggle clasp. 

Supplies:
Polymer clay leaf pendant (1 1/4" long) 
10 Czech glass beads
Branch toggle clasp
28" copper plated chain
10 2" ball headpins
12.5 mm jump ring
4 8mm jump rings 
2 5mm jump rings


Tools needs: wire cutters, chain nose, flat or bent nose and round nose pliers.

1. String one glass bead on a ball headpin, create a wrapped loop by wrapping the wire under the headpin twice tightly and two-three times over the top to create a messy wrapped look. Trim excess wire with wire cutters. Repeat with remaining 9 glass beads.

2. Attach an 8mm jump ring to the leaf pendant. 

3. On the 12.5mm jump ring string on the leaf pendant and three of the glass bead dangles on each side of the pendant. 

4. Use an 8mm jump ring to attach the 12.5mm jump ring to the ring of the toggle clasp.

5. Use an 8mm jump ring to attach 2 of the larger glass bead dangle to the bottom of the ring of the toggle clasp on one side of the pendant. Repeat on the other side of the pendant.

6. Use 5mm jump rings to attach the ends of the chain to the bar and ring of the toggle clasp. 

If a shorter chain is desired use either 24" or 20" length chain. 

I'm offering a few kits for the necklace in my Etsy shop.


Sometimes in my Humblebeads VIP Party Facebook group I'll ask for suggestions for new beads. One that caught my eye and pulled my muse in was the request for a leaf that would work with my bird beads. Challenge accepted! 

I had a mold from leaves from my front yard and wanted to make a pendant that was romantic, lush and felt like that fit the woodland feel of my birds. I love them and have been having fun using them in my designs. 

April 26, 2017

Pretty Palettes April Reveal: Humblebeads + Halcraft

 
I was so thrilled when Molly from the Halcraft team asked if she could use my artwork as this month's Pretty Palette Inspiration. Halcraft sent me a lovely package of beads for this month's challenge in the hues above and I created a ton of beads in this color palette to match.  

First up is a bracelet using stones and glass from Halcraft with a Humblebeads toggle and disk beads in coordinating colors. I used the Halcraft beads a fun dangles on the large copper jump rings. The heavy stones in the back help balance out the design and ensure my toggle with stay on the top of the wrist.


Next up are the same glass beads with some fun acrylic beads from Halcrft (those faceted teal ones, I love the shape and color!) I created a wire fringe for the beads and knotted a very long necklace with a similar bead combination. I used a waxed linen in a rust color for this design.


I created the bird with the colors from the challenge. I also used raw copper for a bright pop of metallic color in the necklace. I added in a few spacers in antique copper. 

I used the same wire fringe design for the earrings with some of the Halcraft beads as accents. I'll be sharing this technique today on Facebook live for Bead Table Wednesday at 2pm EST. 

And here is the little tour of some of the beads I made this month inspired by the color palette. You can find beads in my Etsy shop.


And I'm super excited to share that the pattern from this month's challenge can also be found on fabric in my Spoonflower shop! Stop on over to check it out. 

To see more of my art work visit my website at HeatherPowersArt.com

Thank you Molly and Halcraft for another fun month of inspiration. Stop by the Halcraft blog to see what everyone else made for the challenge! I can't wait to see what my creative friends have been up to and how they were inspired by my painting.  

March 29, 2017

Halfcraft + Humblebeads: Pretty Palettes Challenge

I was invited this month to participate in Halcraft's Pretty Palette Challenge this month. I was gifted an assortment of beads in hues of peach, orange, green and brown. I loved the earthy combination and pulled out some art beads to help add a story to this lovely collection of glass, stones and wood.

For those of us in the north that weather through dark, cold and grey winters, it takes quite a bit of faith to trust that the promise of spring is right around the corner by March. Even thought a snowflake may still fall this time of year, once I hear the birds sing for the first time in spring I know the world will soon wake up. I wanted this necklace to capture that faith in the promise of spring!

For this first necklace I used 1mm gold leather from Classic Elements and strung on those gorgeous wood disks from Halcraft. I paired one of my Gilded Bramble Birds and Diane Hawkey word bead in shades of green. 

I was pleasantly surprised that those green jasper chips had large enough holes for the leather, but they did! I don't think I've used chip beads since my beginning days of jewelry making. I have to say I like their organic, rustic look. 

I used some of the seed beads sent in a mix of beads and finished the design with a leaf button.

This design used more the seed beads from the Halcraft mix. I strung them on headpins to make a tiny tassel with an enamel leaf from Gardanne Beads. I wrapped a wire nest for my Gilded Bramble Bird. 

I had one wooden disk bead left, so I didn't want to waste that! I used another word bead from Diane Hawkey that was the perfect color and sentiment. On the pearl leather cord I strung wood beads from the Halcraft stash. 

(I'll be sharing how to make wire nests for your birds and other beads today on Facebook live at 2pm EST. https://www.facebook.com/humblebeadspage/

When I saw these ceramic beads in my package I was both delighted and little scared. These are some big beads girls! I actually almost bought them last month but chickened out because of their size. My goal for this necklace was to make something I'd wear, so I thought simple, little nature thrown in but let those big beads do the talking.

I really love the mottled finish on the beads, they reminded me of my Monarch Beads, so I pulled those out from my stash along with those oval wood beads. The round wood beads are from Halcraft.

I strung on the large beads and used a spacer before I knotted the 1mm leather cord that I used for the necklace. I knotted between all the other beads and finished this necklace with adjustable knots. Simple, but fun and something I'd totally wear.

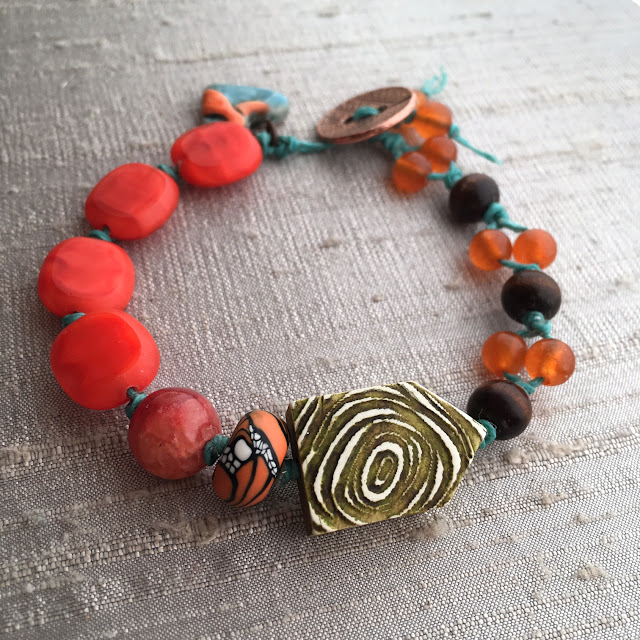
My last design is a knotted bracelet on waxed linen cord. I really went out of my comfort zone with those bright orange glass lentils. But as soon as I saw this tiny heart charm from Mary Harding I knew I could pull it off.

I used one of my Wooden House beads and another Monarch Disk with the glass lentils, quartzite and dye jade beads along with a few more wooden beads. I love how the blue of waxed linen is part of the design throughout the bracelet. 

I want to thank Molly for inviting me to join in the fun this month and a big thanks to Halcraft for providing the beads and inspiration! 

Stop over to the Halcraft blog to see more creations inspired by this month's Pretty Palette challenge and to learn more about the beads. 

Gilded Bramble Birds, Monarch Beads and Wooden House beads can all be found at my website, www.humblebeads.com


March 28, 2017

Leather Charm Tassel Tutorial

I love this embossed leather and have been having fun finding all sorts of ways to use it in my jewelry. I created this tassel with a small ribbon clamp and wire-wrapping beads around it for a little extra embellishment.

Supplies:
5/8” x 1 ½” leather strip
16mm copper ribbon clamp
11/0 seed beads
Leaf charm
8 ½” 26 gauge brass colored wire
4mm copper jump ring
6mm copper jump ring

1. Evenly cut the end of the leather into 1/8” strips, leaving the top half inch of the leather uncut.

2. Wrap the end of the wire around one side the ribbon clamp two times. With the wire facing the front of the ribbon clamp string seed beads as the same length as the clamp. Wrap the wire around the front of the clamp again. String on another row of seed beads. Wrap the wire around the front of the clamp two more times. Make sure the wire is wrapped very tightly each time. Trim the end of the wire so it is shorter than the clamp.

3. Insert the leather piece into the clamp, use chain nose pliers to close the clamp tightly, squeezing under the beads to close it securely. Re-position the rows of beads if needed so they lay straight across the clamp.

4. Add the leaf charm to the 4mm jump ring, close the jump ring. Add the ribbon clamp loop and the leaf jump ring to a 6mm jump ring.


Resources:
Leather: PeggySueAlso.etsy.com. Leaf charm and jump rings: YadanaBeads.etsy.com. Seed Beads: WhimBeads.com. Ribbon clamps: WhiteWillowCreek.etsy.com.

In the example I paired up my leather charm tassel with coordinating disk and birds from Humblebeads.com and a round ceramic beads from FireflyDesignStudio.etsy.com. The branch connectors are from NunnDesign.com.

My Gilded Bramble Birds are now part of my regular line of beads that can be found at humblebeads.com

January 17, 2017

Muffin Tin Challenge Winner

Thank you to everyone who played along with the Muffin Tin Challenge. I have been enjoying visiting your blogs and links. If you missed it check out the reveal here.

Above are my completed pieces. Sorry for the slightly vague photo, some of the pieces are going to be part of upcoming projects.

I did share my designing process on FB Live while I made this piece. I love it! I made this piece for myself with a Kim Snider butterfly wing, Gardanne Beads enamel butterfly, pewter butterfly button from Green Girl Studio, one of my disk beads and ceramic bead by White Clover Kiln along with Czech glass and vintage crystal chain.

I've been making hearts lately and thought I show one off in a necklace. I paired up my heart with an enamel leaf from Gardanne Beads and a tiny bronze leaf from Anna Bronze. So loving this wider deerskin leather from Nunn Design. 

And now it's time announce the winner of the challenge and a $75 gift certificate from Humblebeads.com

Drum roll please...
Randomly picked from all the entries, our winner is Christine Walker!

You can read about Christine's experience with the challenge and see all her lovely pieces on her blog here.

Thank you everyone for joining me on this creative jump start to the new year. I hope you'll fill up those muffin tins and use this technique whenever you need a productive boost!

If you missed the challenge, feel free to still share your blog post and links on the reveal post.

January 14, 2017

Muffin Tin Challenge Official Enteries

You have until Sunday, January 15th at midnight EST to add your official entry to the Muffin Tin Challenge.

Entries will only be counted if they are in the linky tool or comments on this blog post. 

On Tuesday I will pick one random winner for the $75 gift certificate to Humblebeads.com.

Here is the original challenge post if you'd like the details.

Two ways to enter:

1. I have a blog.

Awesome! Write up a blog post with your filled muffin tin photo and with your finished jewelry. You need at least six pieces of finished jewelry to qualify. Add your blog post link to the Linky Tool below.

*If the linky tool isn't showing up yet add your link to the comments section for now.

2. I don't have a blog.
Awesome! Add your link of your muffin tin and finished jewelry photo to the comments. You have several options:

The easiest way to share your work without a blog is to create a Facebook album and add your photos to the album, share the link to the whole album instead of individual photos.

If you are sharing a photo album link from Facebook make sure the photos are marked public so we can all see them.

Don't use Facebook or have a blog? Use a photo sharing site like Flickr and create an album to share.

Questions? Leave a comment. I look forward to seeing all your wonderful creations.

January 2, 2017

Muffin Tin Challenge 2017


I asked my Humblebeads VIP Party Facebook group what their biggest challenge as a jewelry designer was for 2016. 

Tops were finding time to create, feeling overwhelmed by their bead stash, too busy with family/work obligations, needing motivation and inspiration. 

Well, hey guess what? I have a fun challenge if you fall into any of those categories - and honesty, who doesn't! 

I ran this challenge a few times and always heard back on how it helped with designers crank out a stack of jewelry. What better time than to start the new year with a bang! Join me for this fun challenge that will get you making new jewelry and using up some of your bead stash. 

The challenge is simple:
Fill the cup of a muffin tin with everything you need for one project - so the focal bead, accents, chain, findings - whatever you would need to complete one project and put that in one cup.  Repeat with the other cups.  You now have 6-12 projects in a portable container ready for you to put together.  Grab your pliers/tools and sit somewhere comfy with your muffin tin and put each piece together knowing all your choices have already been made - your mission is to simply arrange those beads in a sassy design and complete those projects as quickly as possible!

So let's play!  

Grab a muffin tin and put together 6-12 projects by January 15th (Midnight EST).  This will be the perfect way to beat those post-holiday blues and jump start your New Year! 

These projects can be UFOs. (Unfinished Objects if you have a pile of half-finished projects.) And yes, it can be as simple as 6 pairs of earrings if that is what you feel motivated to create. 

Take a photo of your muffin tin and one photo of all finished projects (at least 6) - blog, facebook, Instagram or add it to a free album like Flickr and share the link/s on the Reveal blog post here on January 16th.  

On the 17th, I will pick one random winner to receive a $75 gift certificate from Humblebeads.com.  

Pictured above are treasures from Bead & Button and include art beads from: Golem Beads, Vintage Meadows, Lisa Peters and Humblebeads.