


And this is where we ran into a problem. Rosanne and I were expecting magical results, that we'd brush on the metal and patina and bam - it would be this awesome transformation in these vivid, bright colors. But here is the issue, Swellegant is fussy stuff. You need to do a little artsy-fartsy mojo to get the best results. And I'll share some of those tips below. Now if you aren't the artsy type, don't worry - with a little trial and error you can get it.

If you like instant gratification - this is not the coloring system for you. It takes a lot of back and forth to get good results, there is some serious wait time between coats and then after it's ALL said and done you need to wait 48-72 hours and apply a matte sealer. Is it worth it? During the process I was ready to say no, but after giving it some time and working at a little more - I couldn't be happier with the way they turned out. And now no piece of metal is safe in my house! Rosanne on the other hand felt it was too time intensive and didn't get consistent enough results. I will try to win her over again, probably at my retreat this fall because I am so using these in one of my classes!
Oh and another tip - you can't mess it up, use light coats of paint each time to avoid losing details. But if you get to the end and hate your results, just hit it with another coat of metal and patina again to start over.
Here are my results on various metals (mostly pewter) and polymer clay. Scroll down to the bottom for some of my formulas.

Brass Patina

Bronze Patina

Ancient Bronze Patina

Copper Patina

Golden Patina

Acid Green (These are Rosanne's pieces)
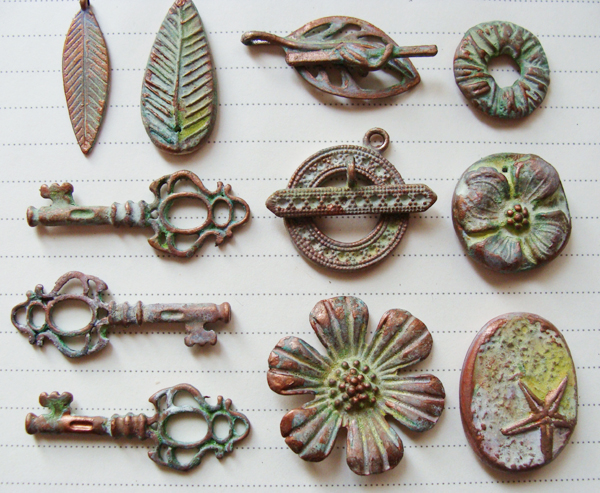
Copper Acid Bath

Rusted Iron

Midsummer Night's Dream
Patina Formulas

MC = Metal Coat, P = Patina, D=Dye-Oxide
1. Brass Patina - Brass (MC), Tiffany Blue (P), Aqua Green (D), White (D), Brass (MC)
2. Bronze Patina - Bronze (MC), Tiffany Blue (P), Aqua Green (D), White (D), Bronze (MC)
3. Ancient Bronze - Bronze (MC), Tiffany Blue (P), Aqua Green (D) repeat dye 2 x, Bronze (MC)
4. Copper Patina - Copper (MC), Tiffany Blue (P), Aqua Green (D) White (D), Copper (MC)
5. Golden Patina - Brass (MC) Green-Gold Verdigris (P), Aqua Green (D), White (D), Sun Yellow (D), Brass (MC)
6. Acid Green - Bronze (MC), Green-Gold Verdigris (P)
7. Copper Acid Bath - Copper (MC), Green-Gold Verdigris (P), Tangerine Orange (D), Chartreuse (D), White (D), Chartreuse (D), Copper (MC)
8. Rusted Iron - Iron (MC), Tiffany Blue (P), Blood Red (D), Silver (MC), Iron (MC)
9. Midsummer Night's Dream - Bronze (MC), Purple (D), Indigo (D), Purple (D), White (D) Bronze (MC), Brass (MC)
34 comments:
Those are amazing! I love all the colors.
Wow these are gorgeous, i love all the colours, i find it really hard in this country to find good patina's, and can't order from over in the USA for for hazard reason,
Gorgeous!
Really, really wonderful! They look amazing.
So mouthwateringly beautiful. I can't wait to try this, thanks for sharing.
This? Pure genius! I have been experimenting but had inconsistent results as well. I was a bit disappointed that I couldn't get it to work for my sampler club this month. But your experiments give me hope! I bought all that pewter with this in mind and I will be referring to your experiments and recipes to help me along! I think that using this in your classes this fall sounds great too. So much potential in these pieces! And now you have my wheels turning ;-)
Enjoy the day.
Erin
P.S. Oh how I wish that I lived closer so that I could play with you girls! There is no one that will do that with me and it is more fun to experiment in a group!
These look gorgeous! That Acid Green is my favorite I think! I love that you can use this metal paint to patina metals that don't normally take these patinas. Thanks for sharing all your tips and experience with this process!
You really did make those pieces come together. I need to learn a little more patience it seems! I' ll give it another try ;0). Love the bead caps. The rusty pieces looked great too. Erin, it is so much better with beady friends and family close by. Thanks Heather for letting me dabble in your patinas!
Wow, thanks for all the formulas! I haven't bought any of these yet--I couldn't decide which colors to get. This definitely helps me figure that out.
Awesome post! I haven't used mine yet, but my eyes are wandering around my table top for items to give this a try on! Thank you!
Wow - these are great - can't decide which is my fav - I really like them all. I am with Erin-it would be fun to have someone to do this with. Do you always have to use the metal one or can you put the patinas right onto copper?
WOW!! Sooo cool!! I never heard of the stuff. It's looks like as awesome addition to patina possibilities.
Fabulous looking results! Thanks for sharing ;)
I haven't heard of these & thank you for the tips. Humm...wondering if it would work on plastic resins? Guess I need to buy some and do some experimenting on the heads I have
These all look fantastic Heather. I may be on Roseanne's side ~ too many steps and time consuming, especially if results are unpredictable. It'll be interesting to see what others do.
As always, thanks for sharing!
What an incredible product, they just transform you polymer beads Heather into a whole other direction, amazing I want it!!
Thanks! I had tried a little myself..didn't know about the addition of dyes on top of the patina...and then to add some more base coat really finishes it off. Thanks for all the "recipes".. will definately try again!
jenni
Bless you for taking the time to record your experiments with these formulas. And then sharing them with all of us. I'm especially in love with the Midsummer Night's Dream. Love the indigo/purple.
Love your pewter pieces Heather!!! Isn't this Swellegant just sooo addictive!
I did not have pewter but tried the variations in a (boring) systematical approach. You can see the results (and more "recipes") on my website: http://chrispellowdesigns.co.uk/Swellegant%20tuto.htm
After seeing your keys, I can't wait to start making things now!
Ordered my swellegant kit last night, thanks!
Wow, fab!! Love the colors; these may work well for me, as my time tends to come in bits and chunks anyway.
WANT to learn how to do this!!!! You make me feel bold & courageous! And I'm normally pretty timid at trying new things.
Thank you so much for making it make sense. I want to try NOW.
Thanks for the tips. Patina is surely not for everyone, it really takes me a week to get a good batch done, and doing matching items is hard. However, if you are patient, like to play, and willing to go with the flow, they can be wonderful. I just ordered some swellegant for my polymer, I cannot wait to try it out!
Heather, what an inspirational and informational post on the patinas. The really are beautiful..and I realize it's not just your amazing styling and photography, but also your skill that was behind the fabulous results on these metal components! What a fun way to spend the day - experimenting!
Your patience certainly paid off, those pieces are spectacular. Which were PC by the way? That would be an exciting treatment for some of my PC items.
Fantastic tips! Thanks for sharing the results of your experimenting with us.
I see I'm going to have to get a few more colors
Thank you soooo much for posting this - i can't wait myself to try some of the color combinations you've come up with!!!!!
christi friesen
I should have taken pictures of our experiments! My friend Kathleen and I had a Swell time;>) playing and I have already made some jewelery to take to my show using it on filigree parts and pieces! Since much of my polymer is canework I prefer to use it on metals. Thanks for posting cuz I actually achieved two of your finishes by accident due to trial and error so now I have the formula! Bless you!
be well, Klew
Heather, thanks so much for sharing this info. The possibilities for application are endless. I have been toying with getting into PMC, but didn't like the idea of kilns and torches. NOW I have an alternative. Thanks again.
That is crazy amazing! Your blog posts are always so fun! Thank you!
i love it!!
Thanks for sharing your knowledge!! I am biochemistry and work with polymer clay. I'm buying a kit right now! It's a long process but it's allways a surprise!
These are beautiful! Please can you write what kind of dyes did you use? Very interesting!
Post a Comment